
You can imagine texting with your customers, but imagine this: doing fully integrated orders through text. No app or special web-app necessary. Here’s an example:
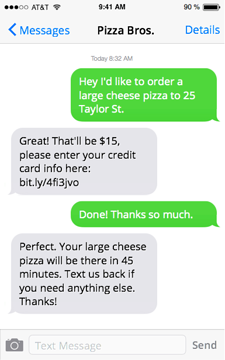
You can do all this too! In this tutorial, we’ll talk about implementing one of the most requested walkthroughs we’ve had: using Stripe to invoice customers over SMS.
We’ll welcome our customers, take their order for a fake pizza shop we created for this tutorial, accept payment information, send them status updates, answer any inquiries — all this with just Sonar, Stripe and very little programming.
You’ll need:
- A Sonar account for two-way text messaging.
- A Stripe account to accept payments. By the way, if you use Braintree, you should still be able to follow this guide and then translate the necessary code to the Braintree API.
- A web host with basic knowledge of HTML and PHP. If your tech-team prefers to write code in other languages, they’ll still be able to follow this tutorial.
How the three will fit together:
- We’ll start by creating a Sonar account at sendsonar.com. There are two important parts to Sonar – there’s the web interface that lets you do things like manage customer information, send and respond to text messages, and coordinate with your team. Second, there’s the Sonar API. We’ll use the API to automatically send customers their welcome message after registration, their order status whenever we charge their card, etc.
- We’ll create a Stripe account to accept customer payments. Stripe provides a great API to manage payments, and a wonderful and simple credit card form that we can use on our website.
- Finally, we’ll need a place to host our website. To accept payment information, we’ll create a payments page that we can send to our customers with the Stripe widget in it. To send customers a welcome message and order status updates we’ll use Sonar’s API.
Step 1: Create a Sonar account
Go to sendsonar.com, click on “Get Access”, and fill out the form. If you’re not from the United States, then send contact@sendsonar.com an email to see if your country is supported.
Once you’re logged in, there are a few parts of the interface to pay attention to:
- The panel on the right, where a customer’s information and any properties that we store about that customer are displayed. You can toggle the panel by pressing .
- The left menu, which can be opened by clicking on . From there, you can manage team-members and get a copy of your Sonar API token from Company Settings. The Company Settings screen also has links to your Subscription management screen, and to the API Docs.
- There’s the left-side customers list where you can see and deal with active customers, and search for customers.
- Finally, the main messaging screen let’s you and your team respond to customer inquiries.
Take a moment to check out the Sonar API Docs. The documentation page provides updated information about Sonar’s API capabilities. But there’s more – the documentation page also covers some of the lesser known but very powerful features of Sonar.
Step 2: Create a Stripe account:
Go to stripe.com. Click on the “Sign up” button, provide your credentials and you’ll be logged in. As you’ll guess from the first modal after logging in, there’s a lot to learn here. But for now, we’ll concentrate on the parts that we need to get our feet wet.
Things to pay attention to in your Stripe account:
- The account toggle – Stripe provides a great, safe way to test everything out before we charge our customer’s real credit cards. We’ll stick to test-mode for now.
- The Stripe documentation. For our tutorial, we’ll just use Stripe’s CURL API. That said, Stripe has libraries available in most popular languages – PHP, Ruby, Java, Node, Go, Python etc..
- To get your Stripe API key, go to , then Account Settings, and then API keys. You can also manage your Team from the Account Settings page. Also, pay attention to the Webhooks pane – we’ll come back to this later when we’re ready to send customers a text upon successful payment.
- Finally, when you’re ready to go live, go to Your account, and then Activate Account.
Step 3: Putting Sonar and Stripe together in the terminal.
Let’s recap. We have a Sonar account setup for sending and receiving SMS messages. We have a Stripe account setup for processing credit cards. We’d like to:
- When someone comes to our website, show them a phone number that they can text us. Alternatively, we can display a short form in, which they provide us their basic contact information.
- Send them a form to provide their credit card information.
- Once they’ve provided card info, we can charge their card and send the customer a confirmation text.
To limit our scope, we’ll try to use only Sonar and Stripe with our PHP script, without any use of our own database.
So, for Step 1, let’s setup a simple form using PHP and HTML:
Check out the code here:
And here’s what it looks like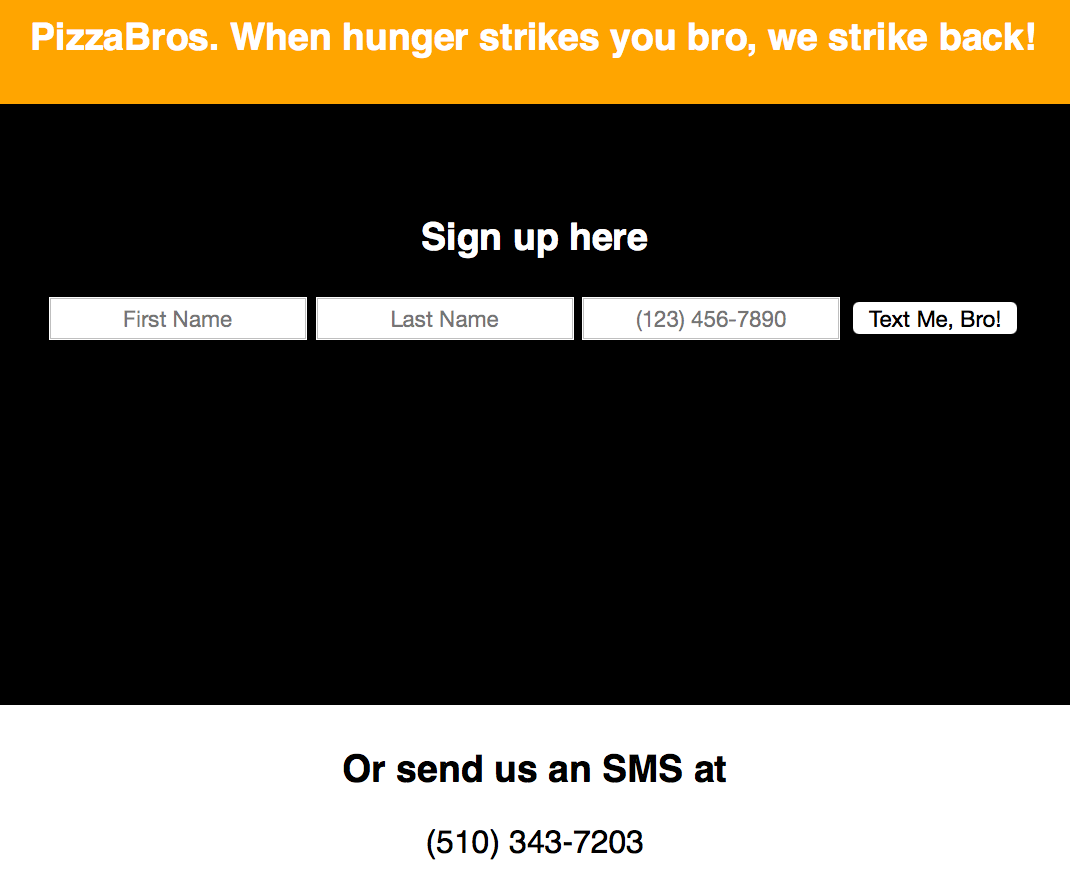
And with that, we let people either text us or register to our PizzaBros service. Next, we’ll setup our Stripe payment page.
Step 2: The payment page:
Stripe lets us put a nice checkout button on our page; clicking the button pops open Stripe’s credit card payment form. You can read about it here: https://stripe.com/docs/tutorials/checkout. We need to take care of a few things:
- Provide a link to our customer to let them pay.
- Set up Stripe’s widget so it displays the correct payment related information.
- Ask Stripe to process the payment once the customer has filled out and submitted successfully.
- Update Sonar with our customer’s Stripe information.
Log into your Stripe account and find your publishable API key. (API key – Your Account -> API Key). Use the code provided in the link above, along with your publishable key to put the payment button on a new payment page.
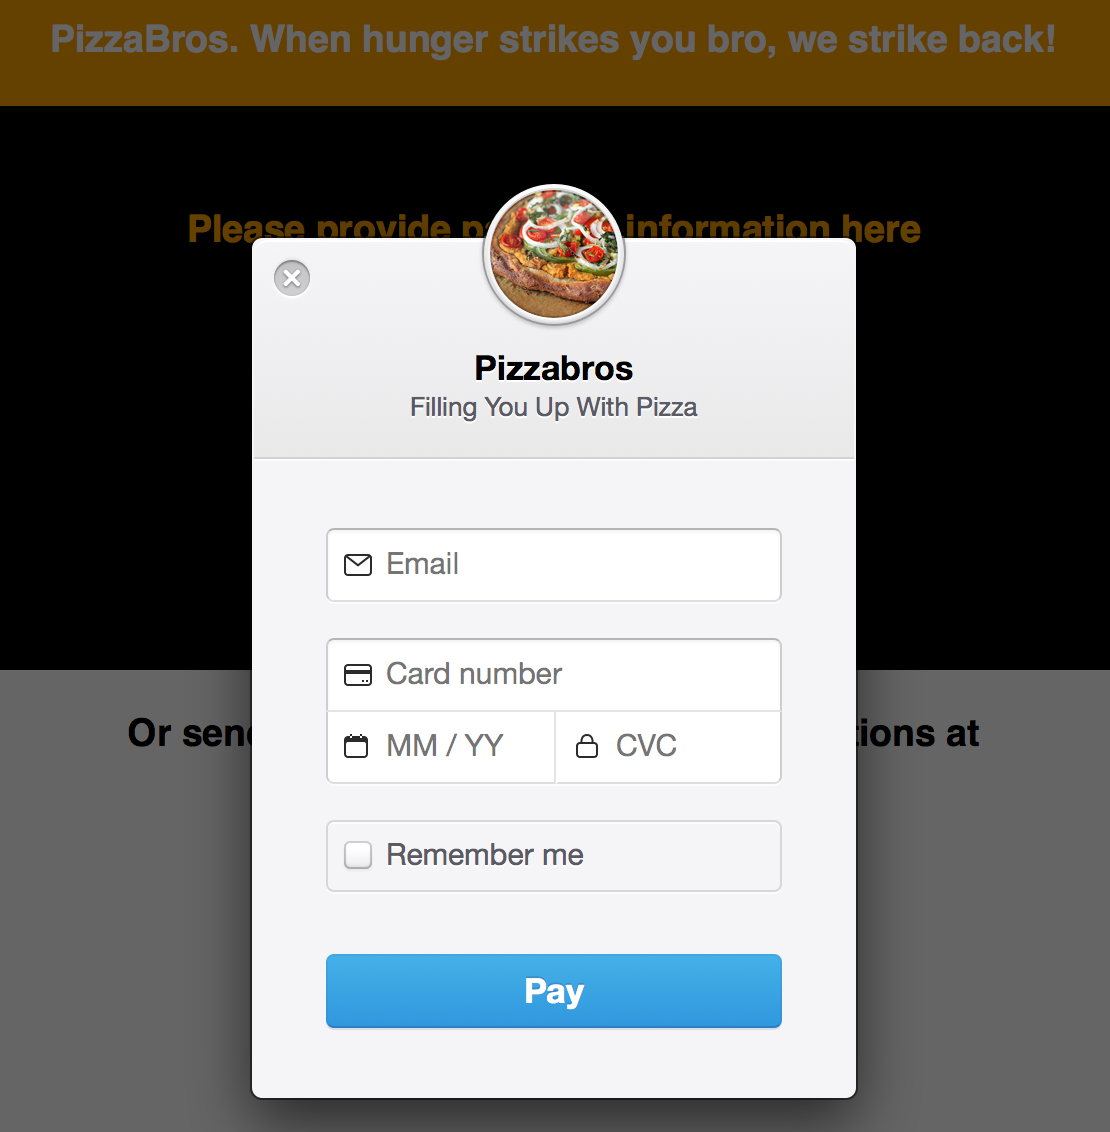
Check out the code here:
It will look something like:
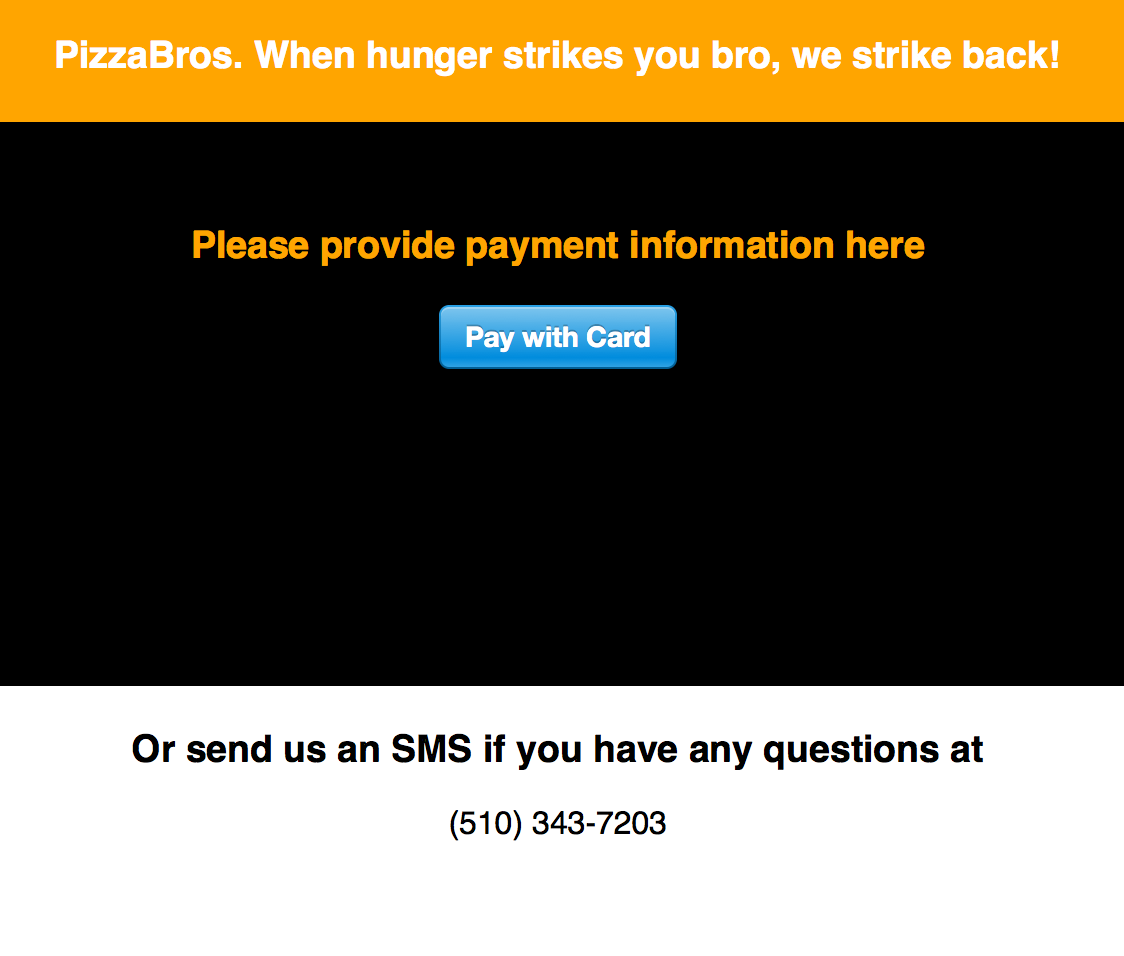
and clicking on the “Pay with Card” button will pop up the check out form like this:
Now that we have this payment page setup, when a customer provides their contact information, we should create a payment link to accept their card information. To do this, we’ll need to update our onboarding page to:
- Create a Payment link when the customer provides their contact information.
- Update Sonar with the customer’s contact information, along with their payment link.
- Send a customer a text to the payment link. This step can be done immediately, or after asking the customer a few more questions from the Sonar UI.
Here’s what the code for updating Sonar with the customer’s info looks like. We use PHP’s curl methods:
In order to send a message using Sonar’s API, do something like the following. Note that the difference between updating customer information and sending the message is the endpoint url being called as well as the parameters being passed to it:
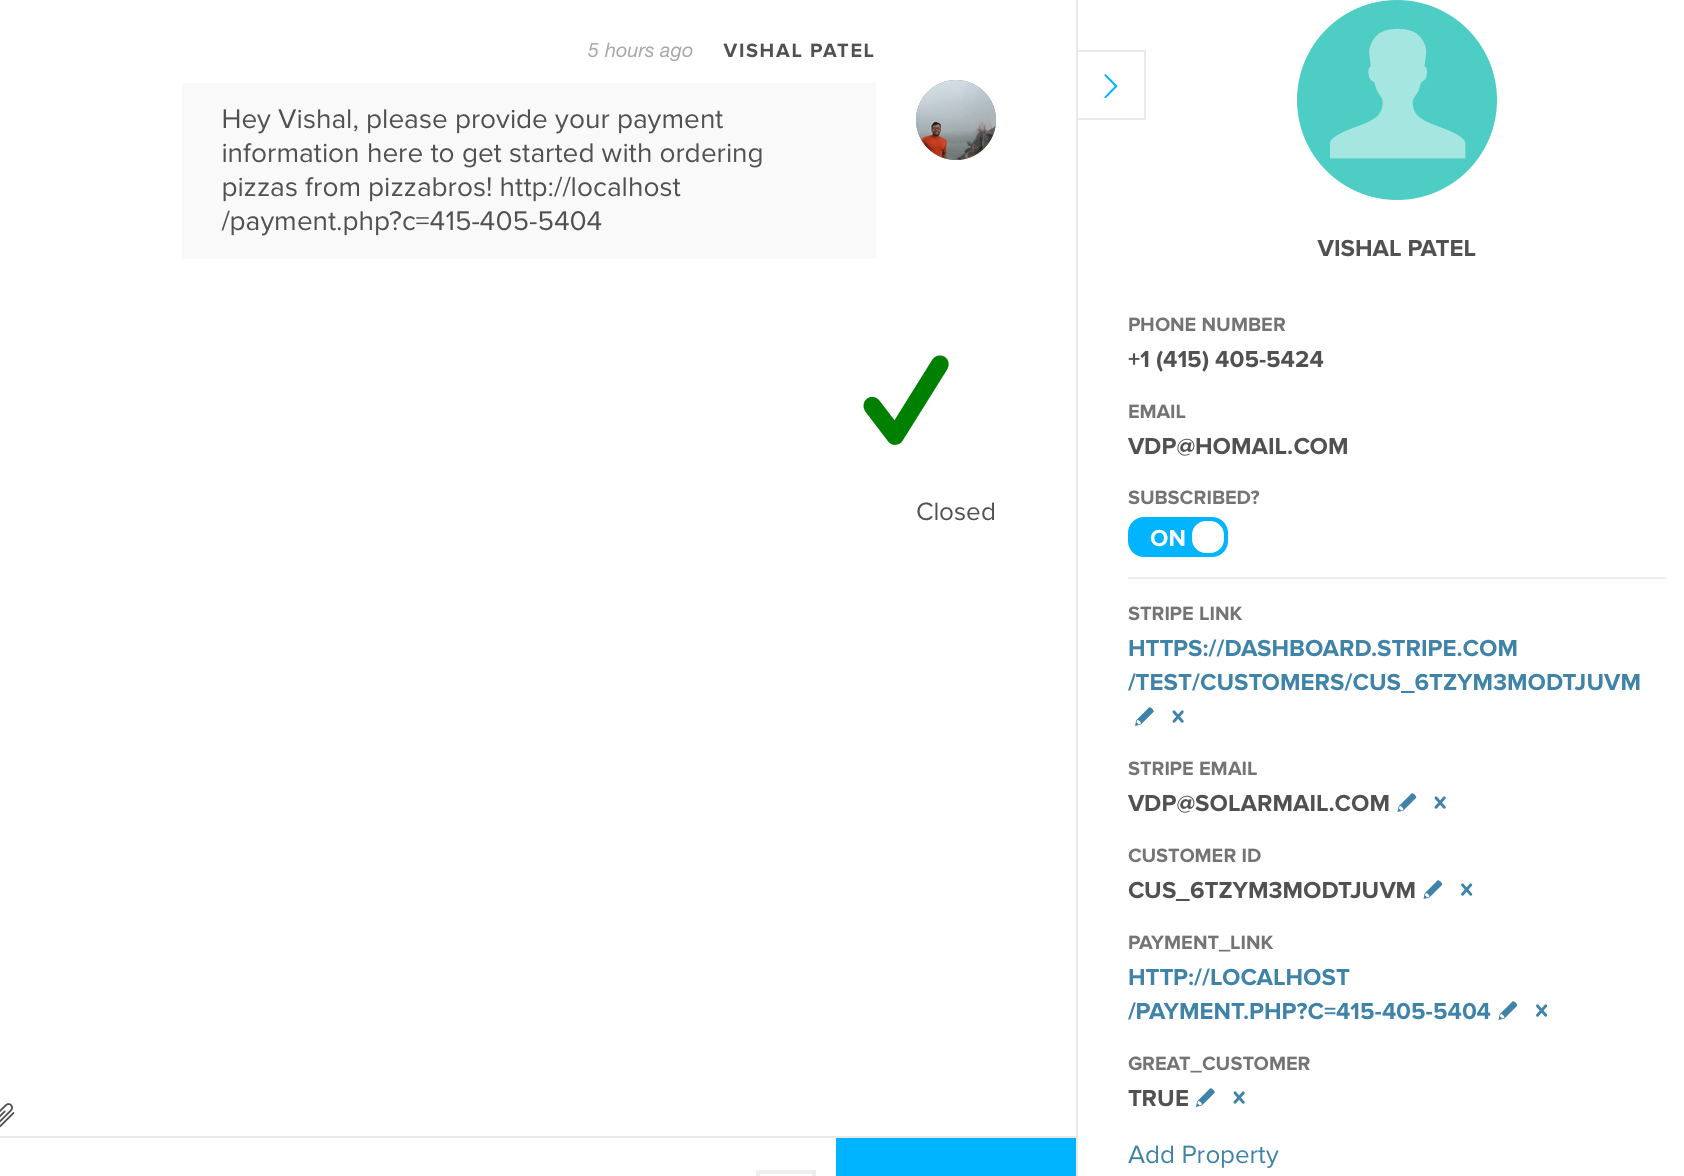
Awesome! We now have the customer’s information inside Sonar and we’ve sent them a link to the payment page. When a customer pays using the payment form, they do not get charged! I repeat, customers do not get charged when they submit the payment form! So, what do we do? When the customer submits the payment form, Stripe automatically inserts a token into the form that’s submitted and sent to our server.
Forcing us to charge from a server-side script, rather than automatically when the customer submits the form is an important Stripe security feature. It ensures we are completely in control of the payment process.
We will use this token to create a ‘customer’ in Stripe. When we do this, Stripe creates a Stripe customer ID for the customer. We’ll store the Stripe customer ID in Sonar (as a customer property) for easy lookup. The Stripe customer ID can be used to create a charge from within our script or by logging into Stripe to create a charge from their UI. Very flexible and powerful.
Here’s what the code for turning the token into a Stripe customer, and then saving the Stripe Customer ID in Sonar looks like:
And here’s what all the customers information, once it has been updated in Sonar looks like, along with our initial text to the customer!
If our customer experience involves charging the customer immediately for a fixed amount, then we can add to our existing script. On the other hand, if we need to ask more questions to the customer, or the customer texted in their order some time after providing their payment information, we can either do it from the Stripe dashboard, or create a separate internal file to create charges. In either case, the code to create a charge looks something like this:
Finally, we’d like to send the customer a confirmation message like so:
At each stage – from asking customers for their contact info, to asking for their payment, to charging them and sending them a confirmation, we try to record as much relevant information as needed to easily lookup or automate the remaining steps. Sonar’s customer endpoint is really great for retrieving updated information about a customer, including stored properties.